
Quick Diagnosis
Continuous Running vs. Short Cycling
The Leak Isolation Test
Cause 1: Water Leak in the System
Cause 2: Stuck or Failed Pressure Switch
Cause 3: Waterlogged Pressure Tank
Cause 4: Failed Check Valve
Cause 5: Well Running Dry or Low Yield
Cause 6: Worn Pump or Undersized System
Cost Estimates: DIY vs. Pro Repairs
When to Call a Professional
Summary and Action Checklist
How to Fix a Well Pump That Keeps Running Non-Stop — Causes, Diagnoses and Fixes 2026
A well pump that will not stop running is one of the most stressful problems a homeowner can face. You hear the motor humming endlessly, water bills climb, and you are wondering if the pump is seconds or hours away from burning out. The good news: in most cases, the cause is something you can diagnose yourself and fix for under fifty dollars.
This guide walks you through the six most common causes of a pump that will not cycle off, with step-by-step diagnosis for each one, plus clear cost estimates so you know when to do it yourself and when to call a pro.
Quick Diagnosis
Before diving in, use this five-minute diagnostic flowchart to narrow things down fast:
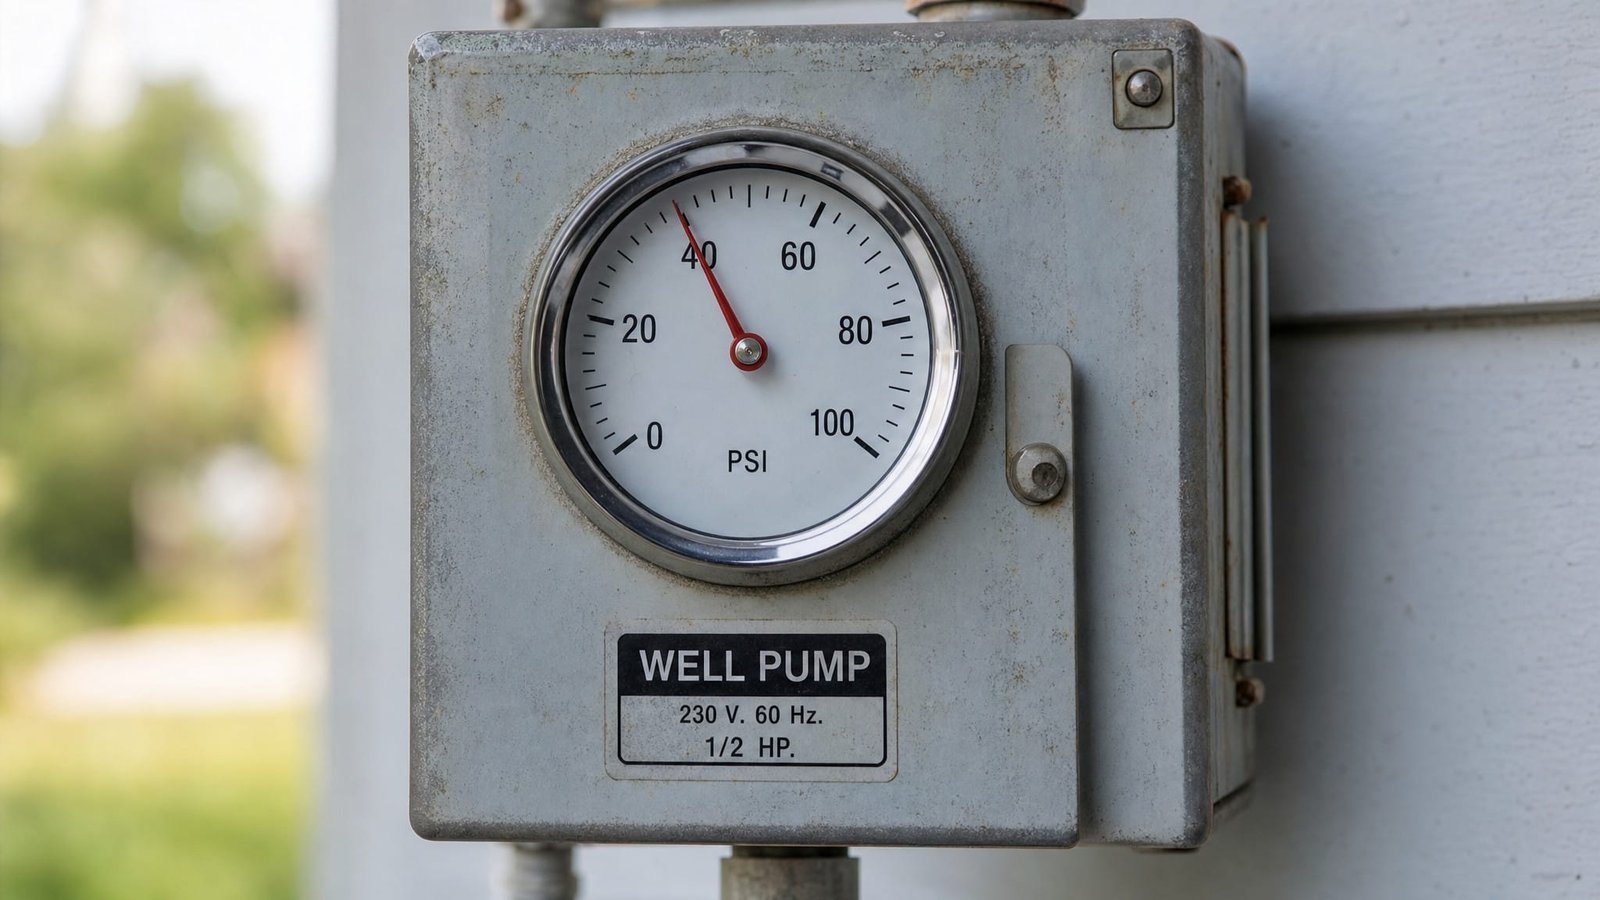
Step 1: Check the pressure gauge.
Pressure climbs but never reaches cut-off (50 to 60 PSI): Water is leaving the system faster than the pump can replace it. Most likely a leak somewhere. Go to Cause 1.
Pressure is already at or above cut-off but pump still runs: The pressure switch is stuck. Go to Cause 2.
Pressure stays at or near zero: Severe pump failure or dry well. Go to Causes 5 or 6.
Rapid on off cycles (every few seconds): Waterlogged pressure tank. Go to Cause 3.
Step 2: Run the Leak Isolation Test (see below). Close the shutoff valve between the pressure tank and your house. If the pump shuts off, the leak is inside your home. If it keeps running, the problem is between the tank and the well.
Step 3: Turn off the pump at the breaker if it has been running for more than 30 minutes. Residential submersible pumps are designed for intermittent duty. Running nonstop beyond 20 to 30 minutes generates heat faster than the water can cool the motor, accelerating winding degradation. Turn it off, fill a few containers for immediate use, then diagnose.
Step 4: Check toilets first. A running toilet is the number one cause of continuously running well pumps. Even a tiny flapper leak can bleed enough pressure to keep the pump going all day.
Continuous Running vs. Short Cycling
These two problems sound similar from a distance but have completely different causes and fixes. Getting them confused is the number one mistake homeowners make.
Continuous running: The pump turns on and stays on for minutes or hours without shutting off. The pressure gauge either climbs very slowly and never reaches the cut-off point, or reads at a low pressure and holds there. This article covers this problem.
Rapid short cycling: The pump turns on for a few seconds, shuts off, then turns on again within seconds or minutes. You hear quick click-on, click-off, click-on, click-off cycles. This almost always means the pressure tank bladder has failed and the tank is waterlogged.
Why the distinction matters: If your real problem is a leaking toilet flapper (Cause 1), replacing your pressure tank (Cause 3) is a three to eight hundred dollar mistake. Use the diagnostic steps above to make sure you are tackling the right problem.
The Leak Isolation Test
This is the single most valuable diagnostic test for a continuously running well pump, and it costs nothing.
- Locate the shutoff valve between your pressure tank and the house supply line. It is typically mounted just after the pressure tank on the outlet side.
- Turn the valve clockwise until it stops. You have now isolated the well system from your house plumbing.
- With the pump running, watch the pressure gauge. If it climbs normally and the pump eventually shuts off at cut-off pressure, the leak is inside your house. Open the valve and check every fixture.
- If the pump continues running nonstop even with the house supply closed, the leak is between the pressure tank and the well — meaning a failed check valve, a leaking drop pipe, or a compromised pitless adapter.
This test alone saves homeowners thousands of dollars by ruling out the wrong repairs first.
Cause 1: Water Leak in the System
A leak is by far the most common cause of a pump that runs continuously. Here is why: a pump shuts off when system pressure reaches the cut-off setpoint (usually 50 or 60 PSI). Any leak bleeds pressure from the system faster than the pump can build it. The pressure never reaches cut-off, so the pump never shuts off.
The maddening thing about leak-caused continuous running is that the leak does not have to be dramatic. A toilet flapper leaking a few ounces per minute is enough. A slow drip from an outdoor hose connection, a reverse osmosis system in regeneration mode, or a backwashing iron filter going through its flush cycle — all produce the same result.
Where Indoor Leaks Hide
Running toilets are the single most common culprit. A flapper that does not seal completely allows water to drain constantly from the tank to the bowl. You can often hear a faint hissing from inside the toilet tank. The dye test confirms it: add food coloring to the toilet tank (not the bowl). If color appears in the bowl within 15 minutes without flushing, the flapper is leaking. New toilet flapper: five to fifteen dollars, five-minute replacement.
Other indoor leak sources:
- Faucet drips. A single slowly dripping faucet may not trigger the pump visibly, but multiple slow drips across the house add up.
- Outdoor hose bibs. A garden hose left connected with a slow drip is often overlooked because it is out of sight.
- Water treatment equipment. Reverse osmosis systems require continuous flow during purification. Iron filters and water softeners go through backwash cycles that use significant water. If the pump runs during the night when no one is using water, a water treatment system is a strong suspect.
- Irrigation systems. A stuck-open irrigation zone valve leaks continuously even when the controller is not calling for water.
Where Underground Leaks Hide
If the leak isolation test confirms the leak is outside the house, the underground supply line from the well to the house is the most common location. Wet or unusually green grass along the path between the wellhead and the house entry point is the best surface indicator of an underground pipe leak.
Fix
DIY fix for indoor leaks: Fix running toilets and dripping fixtures yourself. These are straightforward and inexpensive.
Professional help needed for: Underground supply line leaks. Locating and accessing a buried pipe requires excavation. A well contractor or plumber with leak detection equipment should handle this.
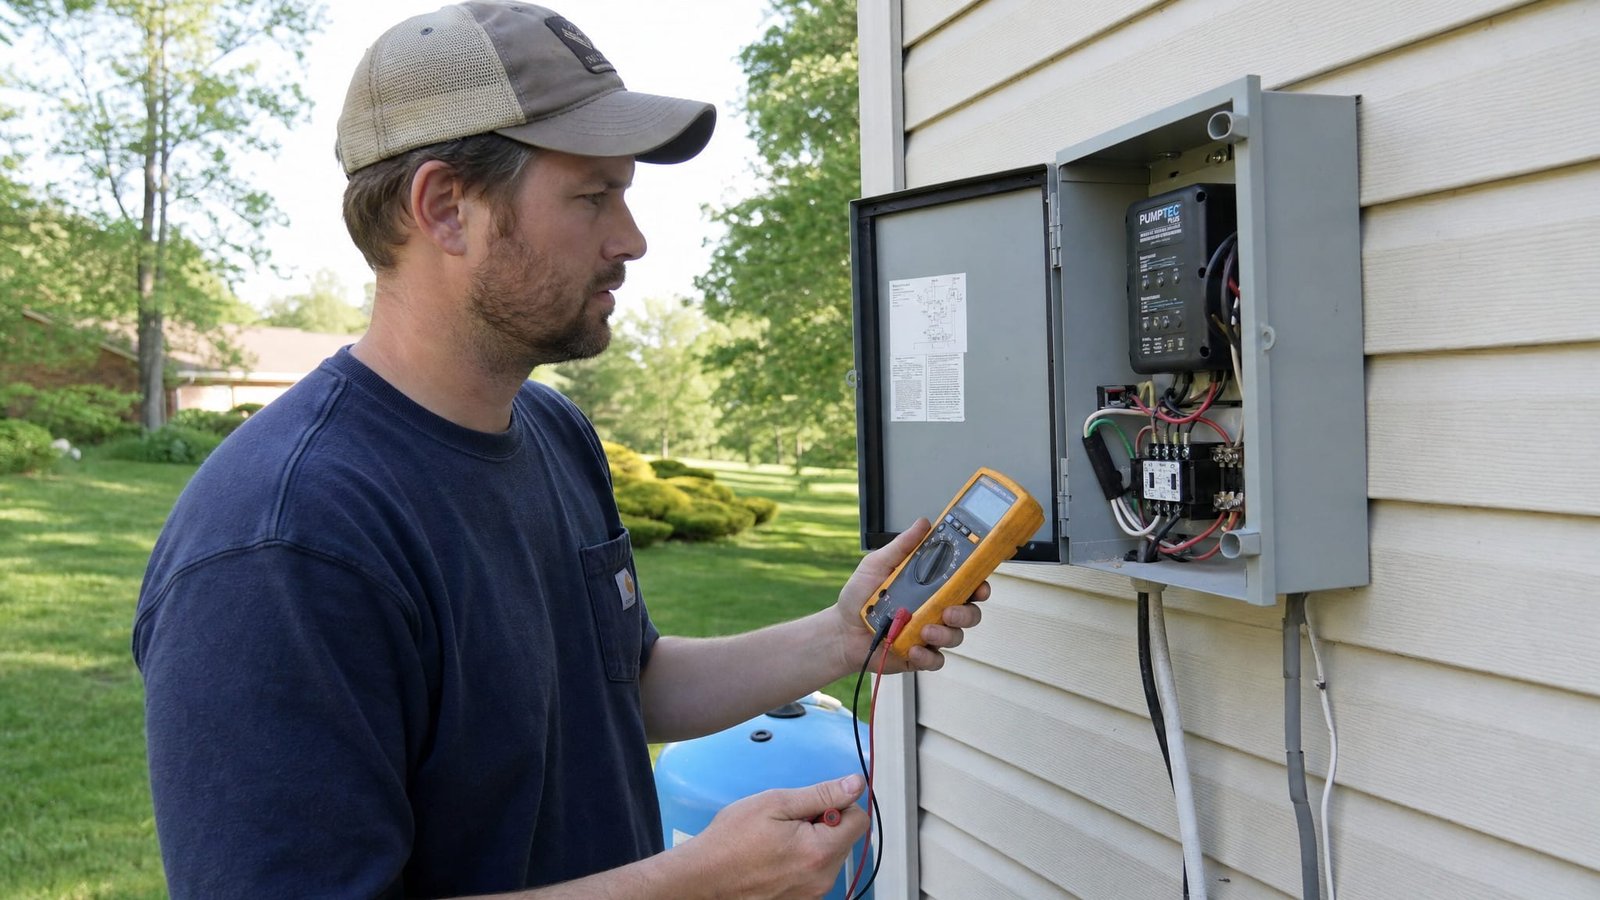
Cause 2: Stuck or Failed Pressure Switch
This is the only cause where the pump runs even though system pressure is already at or above the cut-off setpoint.
The pressure switch is supposed to open its electrical contacts when pressure reaches cut-off (50 or 60 PSI on most systems) and stop the pump. When the contacts fail in the closed (on) position, the pump runs regardless of pressure. You will see the pressure gauge reading normal or even elevated pressure, but the pump keeps running.
How Contact Failure Happens
- Corrosion and welding. The electrical contacts inside the pressure switch pit corrode from years of making and breaking the circuit. Eventually they can weld together in the closed position from electrical arcing. A switch in service for five to ten years is a reasonable suspect.
- Insect intrusion. Ants colonize the warm interior of the switch and can bridge the contacts, holding them closed mechanically. This is surprisingly common and easy to fix.
How to Confirm a Stuck Switch
Turn off the pump at the breaker. Open the pressure switch cover (one nut on top). With a non-contact voltage tester confirming power is dead, look at the contacts. If they are visibly burned, melted, or stuck together, the switch has failed. Also look for insects.
A simple functional test with power on and proper caution: watch the pressure gauge as the pump runs. If pressure reaches or exceeds the cut-off setting but the pump does not shut off, the switch contacts are not opening.
Fix
Replace the pressure switch. A new switch costs twenty to fifty dollars and takes about thirty minutes to install.
- Turn off power completely at the breaker.
- Label the wires before disconnecting.
- Use pipe dope or thread tape on the sensing tube threads.
- Reconnect wires to matching terminals (line to line, load to load).
- After replacement, verify the pressure tank air pre-charge is two PSI below the new switch cut-in setting.
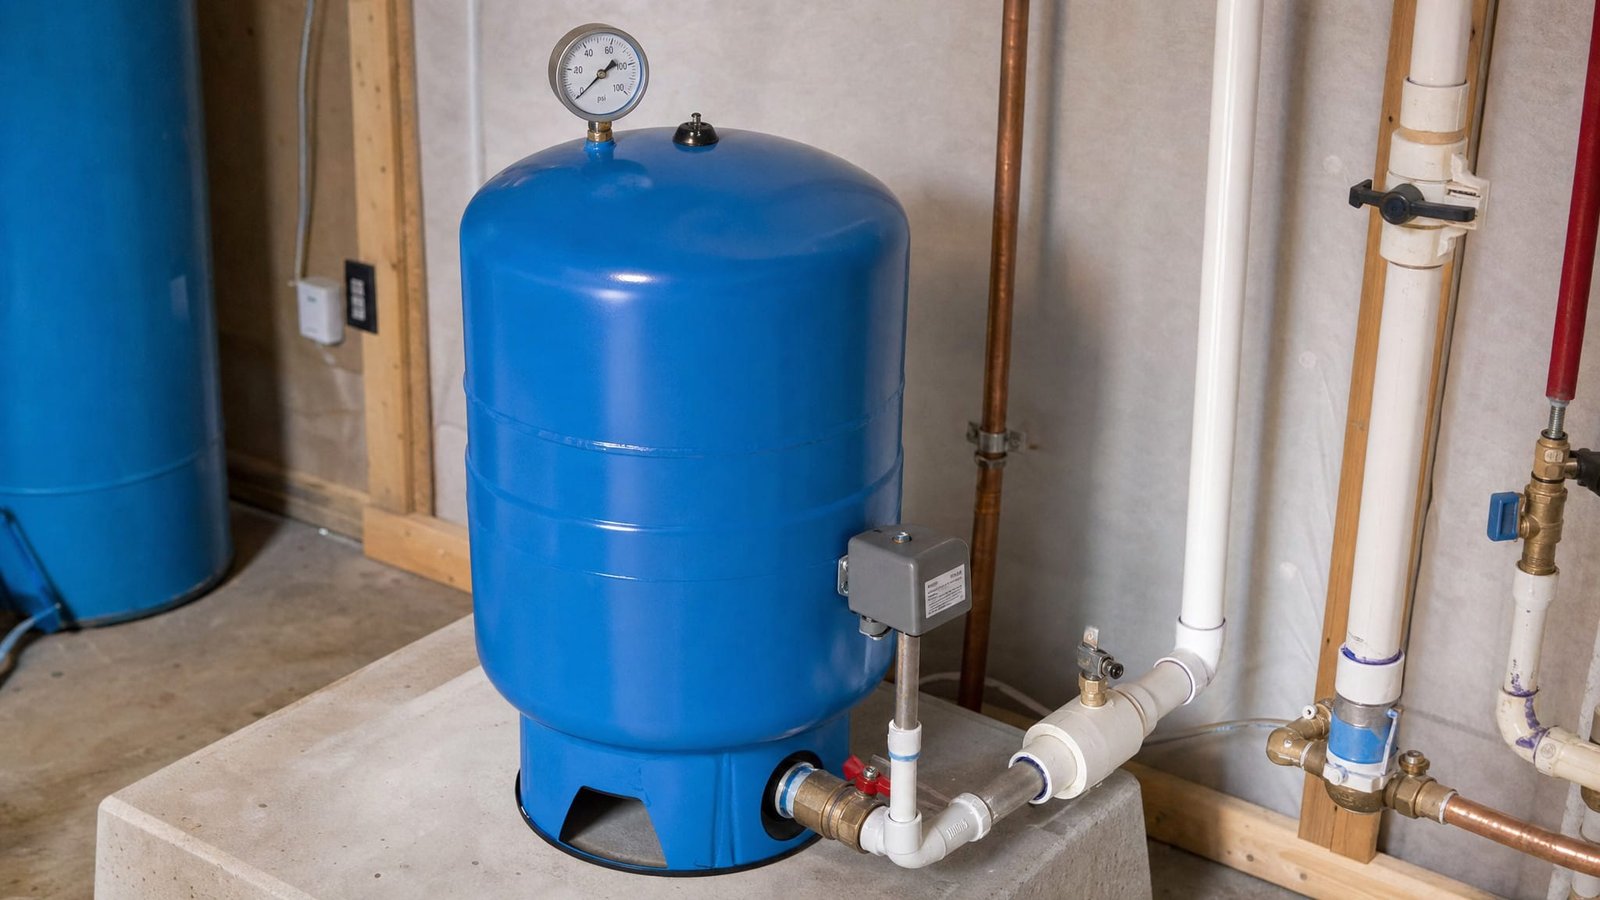
Cause 3: Waterlogged Pressure Tank
A properly functioning pressure tank holds a cushion of compressed air above the water. When the bladder or diaphragm fails, water fills the entire tank. The pump then cycles on and off every few seconds because there is no air cushion left to absorb the pressure changes.
How to Confirm
Locate the Schrader valve on top of the pressure tank (the same type as on a bicycle tire). Remove the cap and press the valve core with a small tool or your key. If water squirts out instead of air, the tank is waterlogged and the bladder has failed.
Fix
A new pressure tank costs two to eight hundred dollars and takes one to two hours to replace. A handy homeowner with basic plumbing knowledge can tackle this, but a professional plumber is recommended because of the electrical connections and pipe fittings involved.
Cause 4: Failed Check Valve
A check valve prevents water from flowing backward down the well pipe when the pump shuts off. When it fails, water rushes back into the well, the system pressure drops immediately, and the pump kicks back on to rebuild pressure. This creates continuous running or very frequent cycling.
How to Confirm
After the pump shuts off, listen closely. A loud water hammer or rushing-back sound at the wellhead is a strong indicator of check valve failure. Also, if you close the house supply valve and the pump still runs, the check valve between the well and the house is the prime suspect.
Fix
The check valve near the pressure tank (on the house side) can sometimes be replaced DIY for twenty to forty dollars. A check valve down in the well requires pulling the pump — call a professional, one to three hundred dollars.
Cause 5: Well Running Dry or Low Yield
If the well aquifer is producing less water than the pump is drawing, the pump will run continuously pulling air and water with no end in sight. This is common during prolonged droughts, seasonal dry periods, or when the well head has slowly lowered over time.
How to Confirm
Listen to the pump: if it sounds louder and more strained than usual, or if it is making a grinding or gurgling sound, the pump may be cavitating (pulling air). Check the seasonal water level in nearby wells — if it is unusually low, your well may be experiencing temporary drought stress.
Fix
Temporary: Install a pressure tank with a larger air cushion and a dry run protection device. This gives the well time to recover between pump cycles.
Long-term: A well driller can assess whether the well needs deepening or a new pump with a lower flow rate to match the aquifer yield. Well deepening: fifteen thousand to thirty thousand dollars.
Cause 6: Worn Pump or Undersized System
Over time, submersible pump impellers wear down and the motor loses efficiency. A pump that once delivered fifty gallons per minute may now struggle to produce twenty. The result: the pump runs continuously trying to meet demand it can no longer fulfill.
How to Confirm
Compare your current flow rate and pressure to what the pump delivered when it was new. If both have dropped significantly and the pump is eight to twelve years old, wear is likely the culprit. A pump flow test (measuring gallons per minute at a fixture) confirms it.
Fix
Pump replacement is a major expense — two to five thousand dollars installed. However, installing a new pump with a slightly larger tank can extend system life and reduce cycle frequency significantly. If your pump is under five years old, start investigating Causes 1 through 5 first.
Cost Estimates: DIY vs. Pro Repairs
| Problem | DIY Cost | Pro Cost | Difficulty |
|---|---|---|---|
| Running toilet flapper | $5 – $15 | $50 – $100 | Easy |
| Pressure switch replacement | $20 – $50 | $100 – $250 | Moderate |
| Pressure tank replacement | $200 – $800 | $400 – $1,200 | Moderate to Hard |
| Check valve (house side) | $20 – $40 | $80 – $200 | Moderate |
| Check valve (well side) | N/A | $150 – $300 | Professional only |
| Underground pipe leak | N/A | $500 – $3,000 | Professional only |
| New submersible pump | N/A | $2,000 – $5,000 | Professional only |
| Well deepening | N/A | $15,000 – $30,000+ | Professional required |
When to Call a Professional
Call a licensed well contractor immediately if:
- The pump has been running nonstop for more than two hours without a known cause — motor overheating and winding failure become highly probable.
- The pump is making grinding, rattling, or screeching noises — signs of mechanical failure.
- You see no pressure buildup at all on the gauge despite the pump running.
- You have zero water flow at fixtures — could indicate a dry well, broken drop pipe, or total pump failure.
- The leak isolation test points to an underground pipe leak — requires excavation and professional leak detection.
- You suspect check valve failure or pump wear — both require pulling the pump from the well.
Safety note: Always turn off power at the breaker before working on any electrical components. Pressure switch replacement is one of the few DIY-friendly electrical tasks — label your wires first, use matching terminals, and verify with a non-contact voltage tester that power is off.
Summary and Action Checklist
Diagnose first, fix second. Use this checklist:
- Turn off the pump at the breaker if it has been running for 30 plus minutes
- Check the pressure gauge — note whether pressure climbs, stalls, or stays at zero
- Run the leak isolation test (close the valve between tank and house)
- Check every toilet with the dye test — fix any running flappers
- Check the Schrader valve on the pressure tank — water means bladder failure
- Inspect the pressure switch contacts with power off — look for burned or stuck contacts
- Check water treatment equipment for automated backwash cycles running while you sleep
- Look for wet spots in your yard along the well to house line for underground leaks
- Note the pump age — 8 plus years with continuous running suggests pump wear
- Call a professional if you have ruled out DIY causes or if the problem involves pulling the pump
A continuously running well pump is almost never a hopeless situation. The majority of cases come down to a fifteen dollar toilet flapper, a thirty dollar pressure switch, or a two hundred dollar pressure tank — all of which are diagnosable with a few dollars in tools and thirty minutes of work. The key is working through the causes methodically rather than guessing and spending money on the wrong fix.
If you follow this diagnostic checklist and still cannot pinpoint the problem, take your gauge readings and test results to a licensed well contractor. Armed with your own diagnosis, you will get a faster, more accurate quote and avoid being upsold on unnecessary repairs.