
A pitless well adapter is the sealed, in-pipe fitting that lets your water supply line, air or vacuum line, and electrical conduit pass through a well casing without ever opening a pit at the bottom of the well. If your well was drilled after the mid-1940s, it almost certainly uses one, and if you are replacing a well pump, doing an annual flush, or fighting winter freezes, the pitless well adapter is the single component you will be working with directly. Getting the sizing, installation, and eventual replacement right is what separates a quiet, reliable well from one that short-cycles, leaks at the casing, or loses its prime every cold snap.
Last updated: October 14, 2026 | Reading time: 9 min
By Robert Harrison, Certified Well Inspector
Robert has 20+ years of experience inspecting and testing residential water wells across the western US. He has opened and serviced hundreds of pitless assemblies and specializes in casing, adapter, and freeze-related failures.
Disclosure: As an Amazon Associate, we earn from qualifying purchases on this page. Product selections are based on independent research and real well water data.
Table of Contents
- What Is a Pitless Well Adapter and How Does It Work
- Pitless Well Adapter vs. Traditional Pit Adapter
- How to Size a Pitless Well Adapter
- How to Install a Pitless Well Adapter (Step-by-Step)
- When to Replace a Pitless Well Adapter
- Pitless Adapter Maintenance and Winterization
- Where to Buy a Pitless Well Adapter
- Frequently Asked Questions
What Is a Pitless Well Adapter and How Does It Work
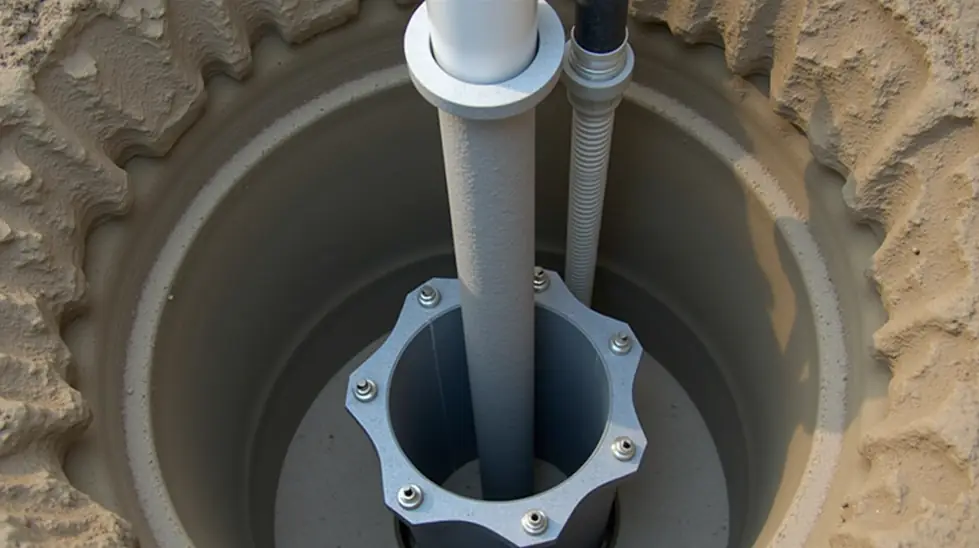
A pitless well adapter is a machined metal fitting, typically cast or forged from malleable iron or ductile iron, that threads onto a nipple welded into the side of a steel well casing at a point above the static water level. Instead of boring a hole to the bottom of the well and building a concrete or gravel pit around it, the adapter plugs into the casing and routes all of the lines that a pump needs up through a sealed port. The name “pitless” comes from the fact that there is no open pit to freeze, collect sediment, or let surface water seep into the aquifer.
The heart of the unit is an internal check valve (sometimes called the pitless valve or the ball check). Here is the mechanism in one line: when the pump runs, water pressure builds in the casing annulus and lifts the check valve, opening a passage that lets water enter the supply line. When the pump shuts off, pressure drops, the valve drops back down under its own weight or a spring, and it seals the opening. That seal is doing two jobs at once — it keeps surface contaminants from traveling down the well when the system is idle, and it holds the prime in a jet-pump system so the pump does not have to re-prime from a dry state on every start.
Three lines typically pass through a pitless adapter, and which ones you have depends on your pump type:
- Water (discharge) line — the pipe that carries water from the pump up to the pressure tank and house. Present on every well.
- Air or vacuum line — a smaller tube, usually 3/8-inch or 1/2-inch, used by jet pumps to move air between the jet and the water column for priming. Submersible pumps do not use this line because they are already submerged.
- Electrical conduit — the threaded conduit that carries the pump motor cable. On submersibles this can be 3/4-inch or larger depending on the motor.
The mechanism in one line
When the pump runs, water pressure lifts the internal check valve and opens the flow path. When the pump stops, the valve drops and seals the annulus — blocking surface contamination and preserving the pump prime. A worn or pitted check valve is the most common hidden cause of short-cycling and repeated loss of prime.
Pitless Well Adapter vs. Traditional Pit Adapter
Older wells (and some still in service) used a pit adapter: a large collar at the very bottom of the casing with an open pit around it. The pump, or the line, sat in that pit. The pit was a maintenance convenience — you could reach the pump and the valve without pulling the whole assembly — but it created two chronic problems. The pit is below the freezing line in cold climates, so it is the first place a well freezes solid, and it is a direct contamination pathway for surface water. The pitless design was introduced precisely to eliminate both risks. If you are replacing a well pump or troubleshooting freeze-ups, knowing which system you have matters, so here is how the two compare.
| Feature | Pitless Adapter | Traditional Pit Adapter |
|---|---|---|
| Assembly location | Above static water level, in the casing | At the bottom of the well, in an open pit |
| Freeze resistance | High — no open pit to fill with ice | Low — the pit is the first thing to freeze |
| Contamination risk | Low — sealed port, no open annulus | Higher — open pit is a seepage path |
| Maintenance access | Moderate — requires pulling the assembly | Easier to reach, but the pit must be cleared |
| Typical cost (unit only) | $40–$150 | $30–$120 |
| Best suited for | Nearly all modern residential wells | Legacy wells; being phased out |
Prices reflect typical 2026 retail ranges for the adapter unit only; labor to install or replace is not included. Per manufacturer spec sheets and regional well contractor quotes.
Pro tip
If you are ever unsure which system you have, look at the top of the well. A pitless well shows a clean casing pipe rising to the cap with the supply line, air line, and conduit bundled together at the top of the casing. A pit well shows a larger collar near the bottom and often a separate pit cover. When in doubt, have a well inspector confirm before you buy parts.
How to Size a Pitless Well Adapter
Sizing is where most pitless well adapter problems start. A pitless adapter is not a one-size-fits-all part — it has to match the diameter of your existing casing, the diameters of the lines you are routing through it, and the type of pump you are running. If the casing is 4-inch, you need a 4-inch adapter, even if the well “feels” like a larger one. The size is almost always stamped or cast into the adapter body itself, so when you are replacing a unit, photograph the old one before it comes out of the well and read the stamp.
The four things you must match, in order of importance:
- Casing diameter — the outer diameter of your steel well casing, most commonly 4-inch, 6-inch, or 8-inch. This is the single most important number. A 6-inch adapter will not seat on a 4-inch casing.
- Water line diameter — the discharge line size, typically 1-inch on residential systems.
- Air/vacuum line diameter — present only on jet pumps, usually 3/8-inch or 1/2-inch. Submersible systems leave this port blanked off.
- Conduit / cable size — the electrical conduit diameter, 3/4-inch to 1-inch for most residential motors.
| Casing Size | Water Line | Air/Vacuum Line | Conduit | Typical Use |
|---|---|---|---|---|
| 4-inch | 1 inch | 1/2 inch | 1/2 inch | Shallow / jet wells |
| 6-inch | 1 inch | 3/4–1 inch | 3/4 inch | Most residential wells |
| 8-inch | 1.5 inch | 1–1.25 inch | 1 inch | High-yield / larger systems |
Line diameters are typical residential defaults. Always confirm against the manufacturer spec sheet for your specific adapter model (Goulds, Pentair, Franklin Electric) before ordering.
Warning
Mismatched sizing is the number-one cause of leaks and freeze-ups on pitless systems. Buy to match your existing casing exactly, not a rounder or more convenient number. If you cannot read the stamp on the old adapter, measure the inside diameter of the casing pipe at the top of the well with a tape before you order.
How to Install a Pitless Well Adapter (Step-by-Step)
Installing or replacing a pitless well adapter is a job most well owners can handle with basic plumbing tools, a pump wrench, and an afternoon, though many prefer to have a licensed well contractor do the work to keep the well’s sanitary seal intact. The steps below assume you are replacing a failed adapter or installing one on a new pitless assembly. Work top-down and keep everything clean — grit and sediment in the check valve are the main things that kill the seal.
- Kill power to the well pump. Turn the breaker for the well pump OFF at the panel and verify with a non-contact voltage tester at the pump control box before touching any line.
- Drain the system. Open a cold faucet to relieve pressure, then let the pressure tank drain so the lines are not fighting you while you disconnect.
- Remove the old adapter. Note which port is water, air/vacuum, and conduit before you unscrew anything. A photo here saves an hour later. On jet systems, disconnect the air line and the water line; on submersibles, disconnect the water line and the conduit.
- Clean the threads and the casing nipple. Wire-brush the casing nipple and wipe the old adapter threads. Remove any old thread sealant. A clean, straight mating surface is what lets the new unit seat true.
- Apply thread sealant. Wrap the adapter threads with pipe thread sealant (PTFE tape or pipe dope rated for potable water). Do not let sealant get into the internal check valve passages.
- Thread the new adapter into the casing. Hand-start the threads, then tighten with a strap wrench or a well pump wrench. Torque by hand plus roughly a quarter to a half turn. Do not use an open-end pipe wrench on the adapter body itself — you can crack the casting.
- Connect the lines. Reconnect the water line, the air/vacuum line (jet systems only), and the electrical conduit to the correct ports. On a submersible, make sure the conduit seal at the cap is tight.
- Prime or verify the seal. For a jet pump, prime the system before restoring power. For a submersible, confirm the pump is fully submerged and the seal at the top of the well is watertight.
- Restore power and run a leak test. Turn the breaker back on, run the pump to cut-off pressure, then watch every thread for weeping. The pump should stop cleanly at the cut-off setting with no air at the faucet.
Pro tip
Keep the check valve clean and dry during installation. A speck of grit seated under the valve face is enough to cause a slow leak past the check that shows up as air at the faucets and short-cycling weeks later. Rinse the valve with clean water and blow it dry before you close the assembly.
When to Replace a Pitless Well Adapter
A pitless well adapter is a long-life component, but it does wear out. The internal check valve face wears with each pump cycle, and the cast body slowly corrodes from the inside out. Most well owners replace the adapter somewhere between 20 and 40 years, but a few symptoms will tell you it is time long before the body finally leaks through. If you are seeing any of the following and the pressure tank and pressure switch have already been ruled out, the adapter is the likely culprit.
- Repeated loss of prime on a jet pump — the pump runs but takes a long time to build pressure or will not build pressure at all. The check valve is no longer holding the water column.
- Short-cycling that is not the tank or switch — the pump starts and stops rapidly even after the pressure tank and switch settings are confirmed correct, because air is leaking past the check valve.
- Air at the faucets — steady air in the water after the pump shuts off points to a slow leak past the internal check.
- Visible corrosion or pitting — heavy rust, pitting, or a weeping thread on the adapter body when the assembly is pulled.
- A cracked or split housing — a physical crack in the casting, often from over-tightening during a prior repair or from freeze stress.
- After a freeze event — even if the well came back online, a freeze can pit the check valve face and cause problems that surface weeks later.
Act on this
If your well is losing prime or short-cycling and you have already confirmed the pressure tank pre-charge and the switch settings are correct, a worn pitless check valve is the most common remaining cause. Replacing the adapter unit costs roughly $40–$150 for the part, with an additional $200–$600 if a well contractor does the labor.
Pitless Adapter Maintenance and Winterization
The main advantage of a pitless well adapter is that it is far more freeze-resistant than a pit system, but “more freeze-resistant” is not the same as “freeze-proof.” The pipe running down through the casing can still freeze in an extreme cold snap if the well is unheated, and the check valve can be damaged by ice. A little routine maintenance keeps the adapter working and protects the rest of the system.
A simple annual routine looks like this:
- Run a full flush once a year to clear sediment from the well and keep the check valve face clean. See our step-by-step guide on how to flush a well.
- Inspect the seal at the top of the well and keep the sanitary well cap intact and gasketed so surface water cannot seep in around the lines.
- Check the pump and lines for leaks at the casing threads, especially after the first hard freeze of winter.
- Keep the well house or pit area insulated where possible, and avoid letting the ground around the well freeze to the casing.
Winterizing a pitless well
The pitless design already does most of the freeze protection for you. For the rest, our guide to how to winterize a well covers insulating the well house, protecting the outdoor line, and what to do if the pump does freeze — and our guide to thawing a frozen well pump walks through safe thawing without damaging the motor or the adapter.
Where to Buy a Pitless Well Adapter
Pitless well adapters are widely available from well-supply retailers and general marketplaces. Match your purchase to the casing size and pump type you identified in the sizing section above. The table below is a starting point; confirm the exact model and thread spec against your existing assembly before ordering.
| Product | Typical Use | Starting Price |
|---|---|---|
| Pitless Well Adapter | General replacement fit, multiple casing sizes | from $40 |
| 4-inch Pitless Well Adapter | Shallow / jet wells on 4-inch casing | from $45 |
| 6-inch Pitless Well Adapter | Most residential wells on 6-inch casing | from $55 |
| Sanitary Well Cap | Seals the top of the well against surface water | from $30 |
| Pipe Thread Sealant | Seals the adapter and casing threads | from $8 |
| Submersible Well Pump | Replacement pump for pitless submersible systems | from $150 |
Prices fluctuate on Amazon; verify the current price and exact model spec before purchasing. Links are Amazon Associates affiliate links.
Frequently Asked Questions
How long does a pitless well adapter last?
Most pitless well adapters last 20 to 40 years. The internal check valve face wears first, and the cast body corrodes slowly over time. Hard water, a freeze event, or over-tightening during a repair can shorten that lifespan.
Can I replace a pitless well adapter myself?
Yes, if you are comfortable with basic plumbing and have a well pump wrench and pump tool. The main risks are cracking the casting by over-tightening and getting debris into the check valve. Many owners still prefer a licensed well contractor to keep the sanitary seal intact and to guarantee the fit.
What size pitless well adapter do I need?
Match your casing diameter exactly — most residential wells are 6-inch casing, with 4-inch on shallow jet wells and 8-inch on higher-yield systems. The size is usually stamped on the adapter body, so photograph the old unit before you remove it. Also confirm the water line, air line (jet only), and conduit sizes.
Why does my well pump keep short-cycling?
Short-cycling is usually the pressure tank losing its air charge or the pressure switch settings being off, but a worn pitless check valve that no longer seals is a common third cause. If the tank and switch are confirmed good, the adapter is the next thing to check, especially if you also see air at the faucets.
Do pitless well adapters freeze in winter?
They are far more freeze-resistant than pit systems because there is no open pit below the freezing line, but the pipe in the casing can still freeze in an extreme cold snap, and a freeze can damage the check valve. Insulate the well house, keep the ground around the well from freezing to the casing, and thaw any frozen pump gently with heat — never with open flame.
See Also
- How to Replace a Well Pump 2026: 7-Step Guide + Costs — the full process of pulling and installing a new pump on your pitless assembly.
- Well Foot Valve 2026: How to Size, Choose, and Install — the valve at the bottom of the suction line that works alongside your adapter to hold prime.
- Submersible Well Pump vs Jet Pump 2026: Which One to Buy — which pump type your pitless well adapter is built for and when to switch.
#PitlessWellAdapter #WellWater #WellMaintenance #WaterWell #HomeWell #WellPump #WellDrilling #PrivateWell #WellCare #WaterQuality #DIYWell #WellOwner #PitlessValve #WellSystem #WaterSystem